Klondike Solitaire Strategy: How to Win More Deals
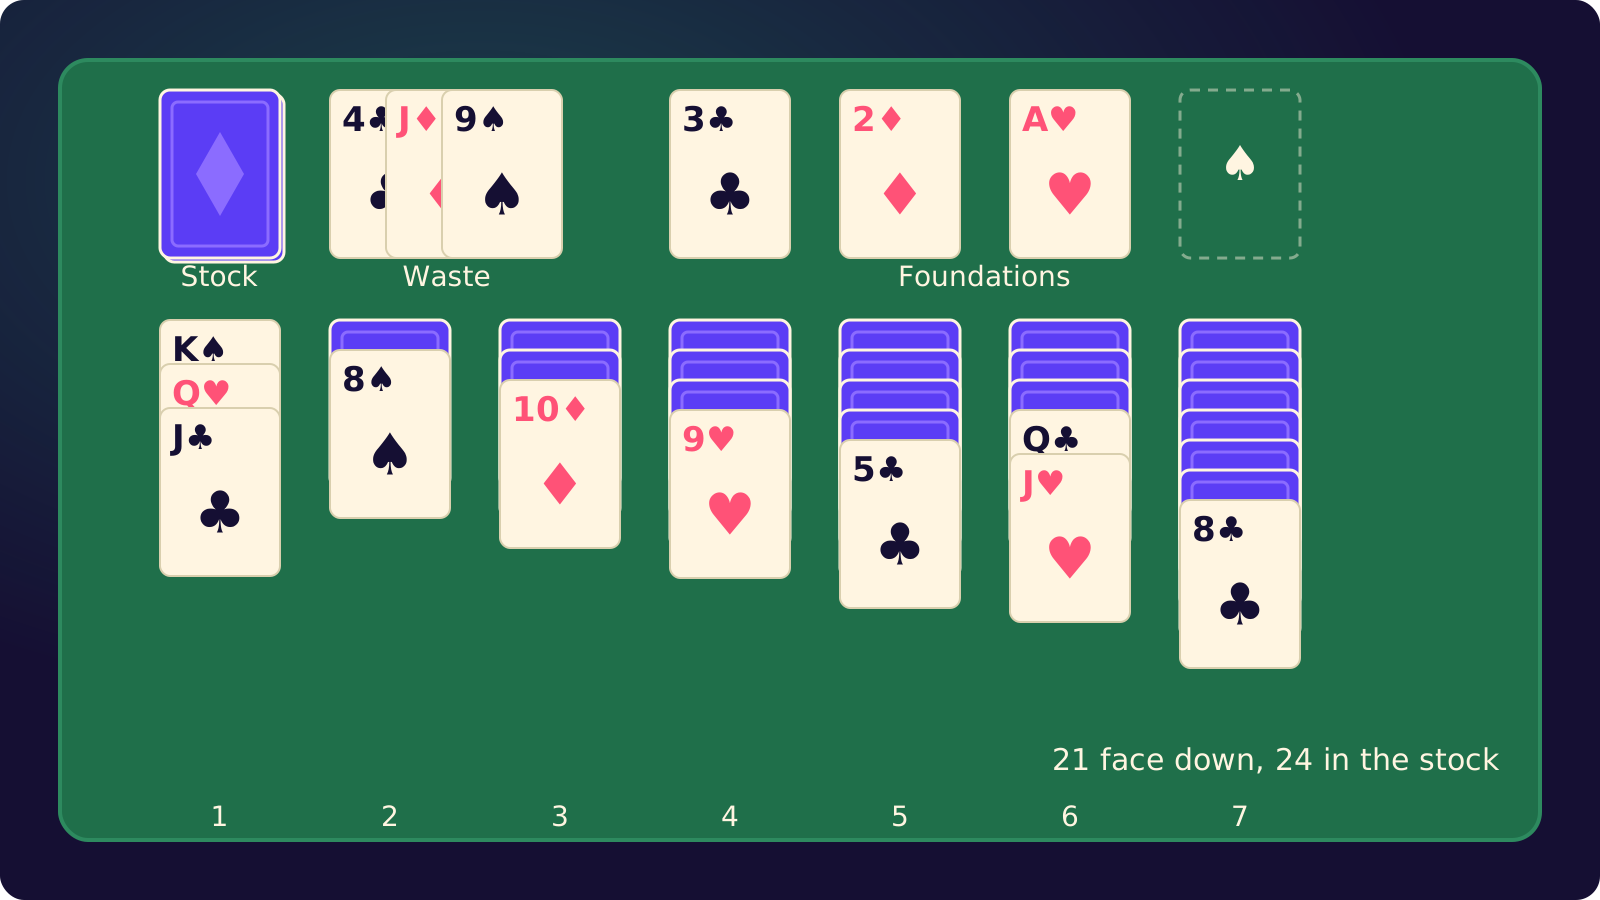
Column seven hides six cards. Column one hides none. That gap decides more deals than any single card, and most of the choices below come back to it.
The five tips on our Klondike Solitaire page are enough to stop losing deals you should win. This is the longer version: a priority list to run through before every move, the exact rule for when a card is safe to send up, the arithmetic behind Draw 3 stock cycling, and three positions worked through card by card. All of it describes our game as built: Draw 1 or Draw 3, unlimited passes through the stock, undo through stock turns, cards allowed back down from a foundation, and only Kings into empty columns.
What the deal gives you and what it hides
At the start you can see seven cards. The other 45 are either face down in the columns or waiting in the stock, and the two groups behave very differently.
The 24 stock cards come round again: with unlimited passes every one of them is reachable eventually. The 21 face-down cards don’t. The only way to see the card under a column is to move everything above it somewhere else, and that’s where deals are won.
Column lengths matter because of where the hidden cards sit:
| Column | Face down | Face up |
|---|---|---|
| 1 | 0 | 1 |
| 2 | 1 | 1 |
| 3 | 2 | 1 |
| 4 | 3 | 1 |
| 5 | 4 | 1 |
| 6 | 5 | 1 |
| 7 | 6 | 1 |
Half of the hidden cards are in columns six and seven. If an Ace is buried there, the game can’t finish until you’ve dug it out. The right-hand side is the work; the left-hand side is mostly tools.
The decision list, in priority order
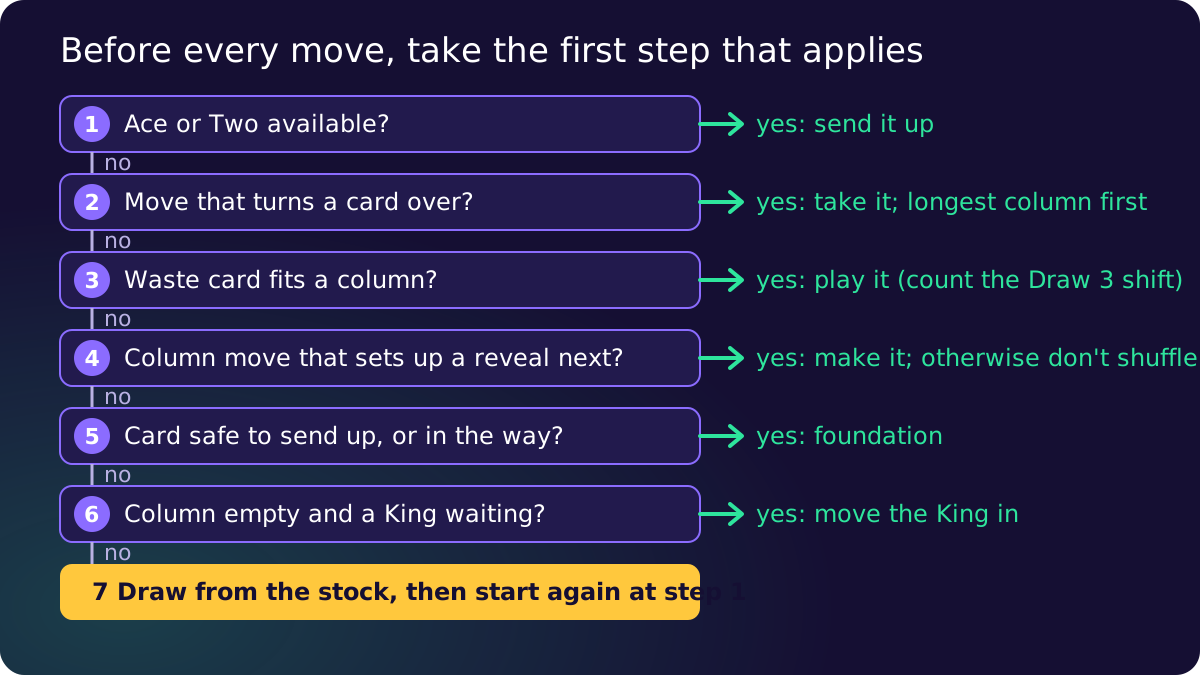
Run through this list from the top and take the first move it gives you. It won’t play perfectly, but it stops the moves that lose deals.
- Send up any Ace or Two. Nothing ever needs to land on them, so they can’t be wanted later. Up they go.
- Make any move that turns over a face-down card. If two moves both reveal a card, take the one from the column with more face-down cards. A reveal in column seven is worth more than a reveal in column two.
- Play a waste card that gets it out of the stock cycle. Even when it reveals nothing, a waste card placed on a column is one fewer card to dig for later. In Draw 3 check what the play does to the cycle first (that’s the section below).
- Move cards between columns only to set up a reveal. Shuffling face-up cards for its own sake uses up landing spots. If the move doesn’t uncover something now or next move, leave it.
- Send cards up only when they’re safe, or when they are physically in the way of a reveal and nothing else will take them.
- Empty a column only when a King is ready to go into it.
- Draw from the stock. When nothing above applies, turn the next card and start again from the top of the list.
Landing spots and colour balance
Every card on the table is a potential landing spot for the two cards of the other colour one rank below it. A black 6 can only ever go on a red 7, and there are exactly two red 7s in the deck. Send both up early and both black 6s have nowhere to go except their own foundations, which may be stuck at 3.
So when you choose which 9 to cover, or which 8 to send up, keep a landing spot of each colour open at the ranks where you still have cards to place.
Why an empty column without a King costs you
Only a King, or a run that starts with a King, can go into an empty column in our game. With no King available, an empty column is dead space, not the flexible slot it is in FreeCell or Spider.
Clearing one still costs something. The cards you moved now cover landing spots another card might have needed, and the move could usually have waited. The column will still be there to clear when a King that’s covering face-down cards comes free. That’s the moment it pays: the King moves, a card turns over, and the space has done its job.
A King already at the bottom of its own column, with nothing under it, gains nothing by moving. Treat it as home.
When is a card safe to send up?
A card is safe to send to its foundation when no card still in play could ever need it as a landing spot. For most cards the quick test is this: look at the two cards of the opposite colour one rank lower. If both are already on their foundations, send the card up.
Take a 7♥. The cards that land on a red 7 are the 6♠ and the 6♣. If both the spades and clubs foundations show a 6 or higher, nothing left in the deck can ever want to sit on the 7♥. Play it up without a second thought.
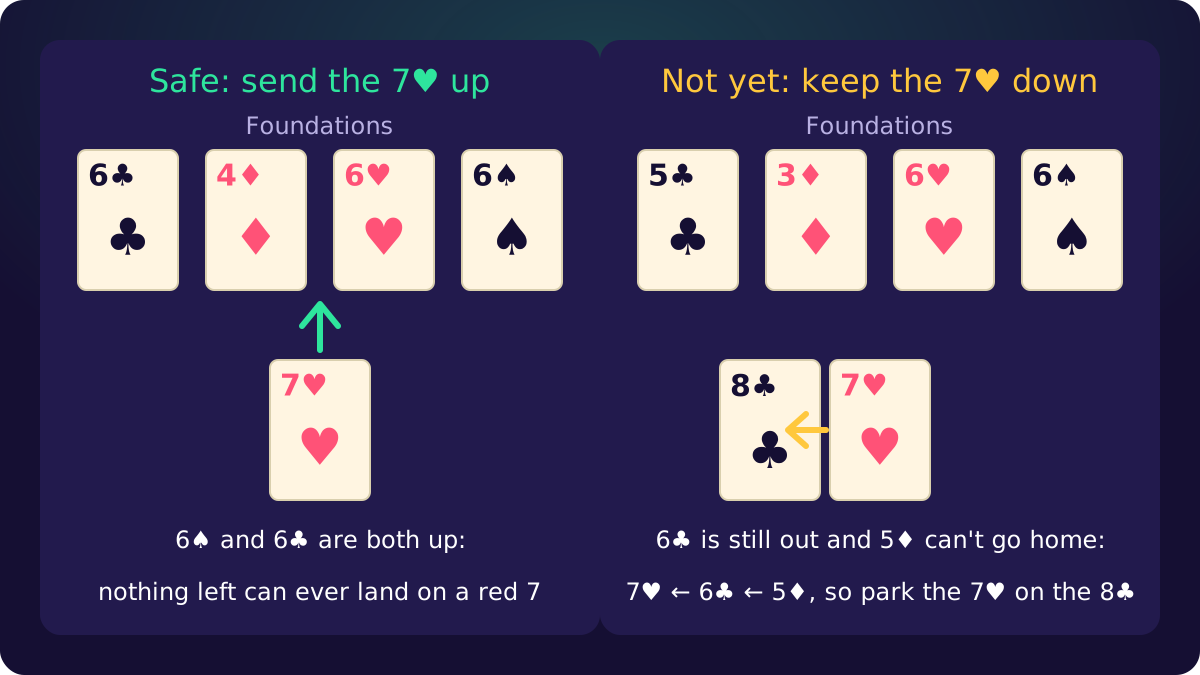
You can push the test one step further when one of those two cards is still in play. Say the 6♠ is up but the 6♣ isn’t, and the clubs foundation sits at 5. The 6♣ can go straight home the moment it’s free, so the only reason it would ever want the 7♥ is to hold a red 5 for a while. Follow the chain: the 5♥ is up (hearts must be at 6 for the 7♥ to be playable at all), and the 5♦ only needs the 6♣ if it has to hold a black 4, which is impossible once both black foundations are at 5. So with spades at 6, clubs at 5 and diamonds at 4 or above, the 7♥ is safe even though a black 6 is still on the table.
The general form: both opposite-colour foundations within two ranks of the card, and the other foundation of the card’s own colour within three. If that’s too much to carry, the simple version is never wrong, just slower.
Our game lets cards come back down
In our Klondike a foundation card can return to a column, so an early play-up isn’t fatal, just a wasted pair of moves. Blake and Gent’s solver study found that only about half a percent of winnable Draw 3 deals actually require a card to come back off a foundation (The Winnability of Klondike Solitaire and Many Other Patience Games, Table 3). Treat the return move as a rescue, not a plan.
One interface detail: a tap in our game always prefers the foundation. If you’d rather keep a card on a column as a landing spot, tap it up anyway, then tap the foundation pile and it comes back down onto a column that accepts it.
How Draw 3 stock cycling works
In Draw 3 you turn three cards at a time and can play only the top one, so on a pass with nothing played you reach every third card in the stock. Which cards those are depends on how many cards have left the stock before them.
Number the 24 stock cards 1 to 24 in the order they come off. The first turn shows 1, 2 and 3 with the 3 on top. The next shows 4, 5, 6 with the 6 on top. Without making a single play, the cards you can reach on a pass are 3, 6, 9, 12, 15, 18, 21 and 24. Eight cards out of 24.
Playing the top waste card exposes the card under it, so within one pass you can get at card 8 by playing card 9 first, and at 7 by then playing 8. Cards 1 and 2 are the hardest in the game to reach: nothing comes before them to shift them, so they only come free when you play the card sitting on them in the same pass.
Our game keeps the stock in the same order between passes: turning the waste over reverses it, drawing reverses it again. A pass with no stock plays shows you the same eight cards next time, and after two such passes the game says “No more useful moves”.
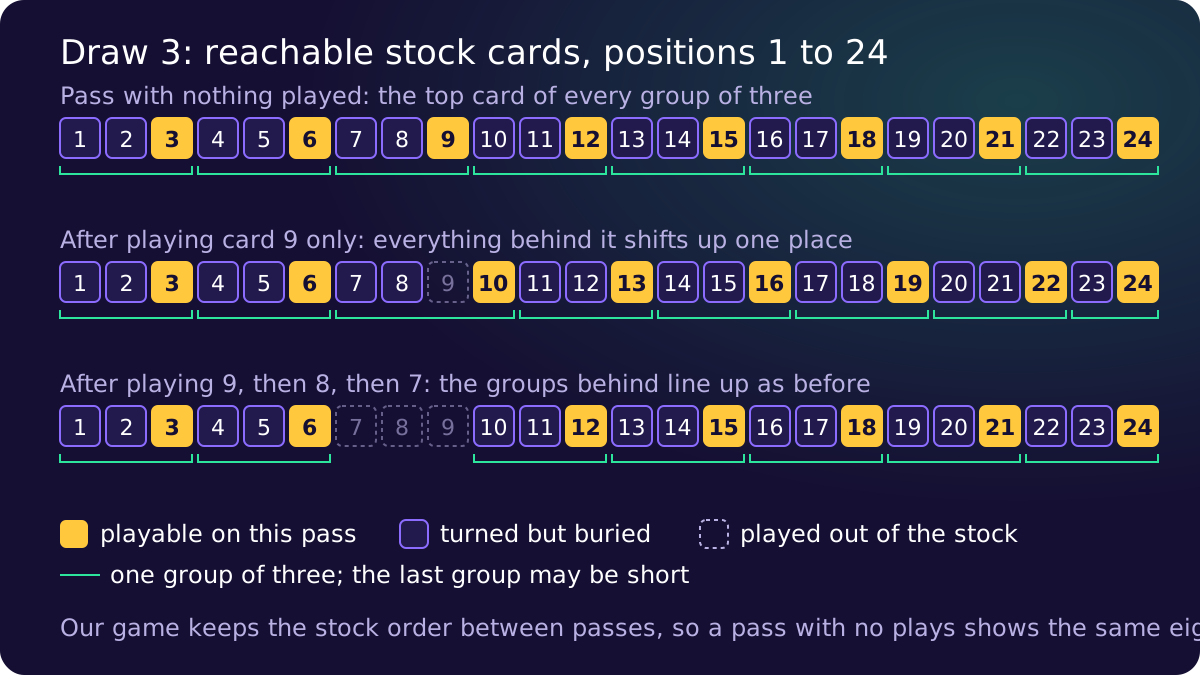
Now the worked example. Suppose you play card 9 onto a column and nothing else. The stock has 23 cards left, and the groups on the next pass become 1-2-3, 4-5-6, 7-8-10, 11-12-13, 14-15-16, 17-18-19, 20-21-22 and a final short group of 23-24. The reachable cards are now 3, 6, 10, 13, 16, 19, 22 and 24. Every card behind the one you removed moved up one place in the cycle. Card 10, which you couldn’t touch before, is on top now. Card 12, which you could, is buried.
Play two cards from the same group (the 9 and then the 8 under it) and the shift behind them is two places: 11, 14, 17, 20, 23 and 24. Play all three and the cards behind line up exactly as they did before.
That gives you a lever. When the card you need sits at an unreachable position, playing exactly one card from earlier in the stock brings it to the top next pass. Playing a card from later in the stock does nothing for it. Every waste play counts, to a column or a foundation, so count before you commit.
In Draw 1 none of this applies: every stock card comes to the top on every pass, so spend your thinking on the columns.
Undo is part of the game, not a cheat
Our Klondike keeps your undo history through stock turns and saves it with the game. Using it is legitimate for the same reason the solvability research studies the “thoughtful” version of the game, where every card is known. Blake and Gent note that games with unlimited undo become thoughtful in practice, because you can always go back after learning what you needed (Blake and Gent). Once you’ve turned a face-down card over, that information is yours, even if you take the move back.
The numbers set a ceiling. With every card visible, Blake and Gent’s solver wins 81.9 percent of Draw 3 deals and 90.5 percent of Draw 1 deals, both with unlimited passes and cards allowed back down from the foundations. An earlier study by Bjarnason, Tadepalli and Fern had bracketed the Draw 3 figure between 82 and 91.44 percent (Searching Solitaire in Real Time, ICGA Journal 2007). Nobody has a verified figure for human play without undo. It’s lower: about one deal in five is lost by the cards, and more are lost to hidden information.
How to use undo well:
- Probe, then rewind. Turn over a card you’re curious about, note it, and back up if the move was otherwise poor. You play with better information from then on.
- Test a whole line. Before breaking up a long run, play the line through. If it stalls, undo to the branch point and try the other move.
- Don’t deal again at the first stall. Back up five or ten moves and look for the stock play that would have shifted the Draw 3 cycle.
We can say all this because the game is ours: no hidden shuffle between passes, no adjustment of the deal. The same in-house approach is why we publish decision tables in the blackjack basic strategy guide and return figures on the fairness page for every casino-style game.
Three positions, worked through
Each position lists only the cards that matter.
Position one: two reveals, one landing spot
The 9♥ is face up on column four. The 8♠ is on column two over one face-down card. The 8♣ is on column seven over six. Both black 8s fit on the 9♥, and the 9♦ hasn’t been seen yet.
Play the 8♣ from column seven. Six hidden cards beat one, and the 8♠ loses nothing by waiting: the 9♦ is still in the deck and will give it a home later. Column two only takes priority when a King covering hidden cards is free and waiting for that space.
Position two: the 7♥ that wants to go up
Hearts are at 6, spades at 6, clubs at 5, diamonds at 3. The 7♥ is on top of column three with two face-down cards under it, and there’s an open 8♣ on column five.
Both moves reveal the same card, so the question is where the 7♥ goes. Run the chain. The 6♠ is up. The 6♣ is still out and can go straight to clubs when it appears, so it would only want the 7♥ to hold a red 5. The 5♦ is still out with diamonds at 3, so it can’t go home yet and the 6♣ might have to hold it. Keep the 7♥: put it on the 8♣. Once the 4♦ goes up, the chain breaks and the 7♥ is safe.
Position three: the tempting empty column
Column one holds a lone 4♦. The 5♣ on column five would take it, which empties column one. The two Kings you can see both sit at the bottom of their own columns.
Leave the 4♦ alone. The empty column could only take a King, and neither visible King gains anything from moving. Meanwhile the 5♣ is one of two landing spots for a red 4, and the 4♥ may need it when it surfaces. Make the move when a King covering hidden cards comes free.
Common mistakes
- Drawing while a column move is waiting. The stock comes round again. A buried card doesn’t.
- Sending 7s, 8s and 9s up because the foundation takes them. These are the ranks where landing spots run out. Run the safe-to-send-up test first.
- Clearing a column with no King in sight. You spend landing spots to create a space nothing can use.
- Moving a King that was already at the bottom of a column. Zero gain, and the column it left is now empty and useless.
- Breaking a long run to reveal one card. If the run was 10 to 5 and there’s no free black Jack for the 10, the reveal leaves a mess.
- Dealing a new game at the first stall. Undo ten moves. The deal is more often winnable than it looks.
- Playing Draw 3 like Draw 1. A waste play that looks harmless can bury the card you were waiting for.
Klondike next to Spider, FreeCell, Vegas and Yukon
The same habits transfer, but each variant on the site moves the emphasis.
| Game | Decks | Face down at start | Stock | Empty column takes |
|---|---|---|---|---|
| Klondike | 1 | 21 | 24 cards, Draw 1 or 3, unlimited passes | King only |
| Spider | 2 | 44 | 50 cards dealt 10 at a time, 5 deals | Any card or in-suit run |
| FreeCell | 1 | 0 | None | Any card |
| Vegas Solitaire | 1 | 21 | 24 cards, Draw 3 three passes or Draw 1 one pass | King only |
| Yukon | 1 | 21 | None | King only |
Spider Solitaire replaces the stock cycle with five deals that drop a card on every column, so the question before each deal is whether your columns can survive it. Reveal priority still rules, but building in suit matters more than colour balance, and an empty column is a workbench rather than a King’s parking space.
FreeCell deals every card face up, so there’s no reveal step at all. It’s pure planning, which is why the solver study puts its winnability near 99.999 percent (Blake and Gent, Table 1). Cards never come back down from a foundation there, so the safe-to-send-up rule is built into its automatic moves.
Vegas Solitaire is Klondike scored in credits: the deal costs 52, each foundation card pays 5, and a card pulled back down loses its 5 again. Break-even is eleven cards. Limited passes change the stock advice: in Draw 1 you see each stock card once, so play everything the current card allows before turning the next.
Yukon Solitaire deals all 52 cards into the columns, 31 face up, and lets you move any face-up card with everything on top of it, in order or not. Same reveal-first instinct, but you dig with tangled stacks instead of neat runs.
All five live in the card games section, free, with undo and your game saved on your device.
Pick Draw 1 for a few deals and work the decision list until it’s automatic: Aces and Twos up, reveal from the longest column, hold the middle ranks, clear a column only for a King. Then switch to Draw 3 and count stock positions before each waste play. Open Klondike Solitaire, deal, and before your first move count the face-down cards in column seven.
Frequently asked questions
What are the rules of Klondike Solitaire?
Klondike uses one 52-card deck. Seven columns hold 28 cards, with only the top card of each face up; the other 24 form the stock. You build columns down in alternating colours, move ordered runs together, fill empty columns with Kings only, and build four foundations up by suit from Ace to King. The stock turns one or three cards at a time and can be reused.
Is Spider Solitaire strategy the same as Klondike strategy?
No. Spider uses two decks, has no foundations or stock cycling, lets any card into an empty column and only moves runs that are in one suit. Revealing hidden cards still matters most, but Spider rewards building in suit and keeping an empty column free before each deal, while Klondike is about landing spots, foundation timing and the stock order.
Can every Klondike Solitaire deal be won?
No. Even with every card known in advance, a computer solver wins about 82 percent of Draw 3 deals and about 90 percent of Draw 1 deals with unlimited passes. A player who cannot see the face-down cards wins fewer than that, so a lost deal is often the cards and not you.
What is a good win rate in Klondike Solitaire?
There is no verified figure for human play, so track your own rate over a few dozen deals in one draw mode and try to raise it. The ceiling is roughly 82 percent for Draw 3 and 90 percent for Draw 1 when every card is known, which is what unlimited undo lets you approach. Draw 1 rates will always sit higher than Draw 3 rates.